Module Installation
This page describes how to install the DNNGo PhotoAlbums module on your DNN site.
System Requirements
Before using PhotoAlbums, make sure your environment meets the following requirements:
- DNN platform: DNN 9.5 or higher (the install package declares a core dependency of 09.05.00)
- Server permissions: SuperUser (Host) permissions
- Browser: any mainstream browser such as IE, Firefox, Chrome or Safari
Prerequisites
You need a working DNN (DotNetNuke) site before installing this module. For help with installing the DNN platform itself, please refer to the official DNN resources.
Installation Steps
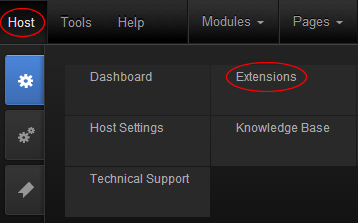
- Log in to your DNN site as a superuser (Host).
- Navigate to Host → Extensions (Settings → Extensions in DNN 9).
- Click Install Extension Wizard, then click Choose File.
- Browse to the
DNNGo_PhotoAlbums_x.x.x_Release_Install.zippackage on your computer and click Next. - The package is uploaded and installed automatically.
When the wizard finishes, all module entries of this package (main module, DashBoard, Search, etc., depending on the version) appear in the Extensions list.
Adding the Module to a Page
After installation, add the module to a page to get started:
- Log in as an administrator and open the page that will display your albums (or create a new page).
- Enter edit mode and click Add Module in the target pane.
- Choose the DNNGo PhotoAlbums main module and add it.
- The first time you open the module, you'll see the entry to the management interface, where you can create your first album.
Multiple module instances
PhotoAlbums supports multiple main module instances on the same page or even across the whole site. The data and settings of each instance are independent of each other.
Next Steps
- Module Overview — the three modules in the package (main module, DashBoard, Search)
- Activating the License — activate the license to unlock all features
- Creating an Album — create your first album