Module Installation
This page explains how to install the DNNGo xBlog module on your DNN site.
Requirements
Before using xBlog, make sure your environment meets the following requirements:
- DNN platform: DNN 9.8.0 or higher
- Server permissions: Host (SuperUser) permissions
Installation Steps
- Log in to your DNN site with a Host (superuser) account.
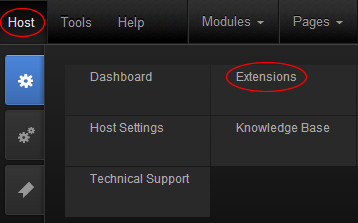
- Navigate to Host → Extensions.
- Click Install Extension Wizard, then click the Choose File button.
- Locate the
DNNGo_xBlog_x.x.x_PA.zippackage on your computer, select it and click Next. - The package will be uploaded and installed automatically.
Add the Module to a Page
After installation, add the module to a site page:
- Click Add New Module in the DNN control bar.
- Find DNNGo xBlog in the module list.
- Drag or add it to the target page.
Management entry
After adding xBlog to a page, enter edit mode as an administrator and you will see the Manager entry. Click it to open the standalone xBlog administration interface, where posts, media library, comments, subscriptions, skins and settings are managed centrally.
Administration Interface
The xBlog administration interface runs independently of the DNN framework for faster performance, and works much like WordPress. The left menu is grouped by function:
| Menu | Description |
|---|---|
| Posts | All Posts, Add New, Categories, Tags, Export & Import, RssFeed Source |
| Library | Media list, file synchronization |
| Comments | Comment list management |
| Newsletters | Subscriber list, add by role, add by email, batch add |
| Skins | Skin options, skin list, skin style |
| Effects | Effect options, effect list, effect style |
| Settings | General, Social, Comment, Captcha, Email, SEO, Rating, Share |
| License | View the Machine Key and activate the license |