Installation
This page explains how to install the DNNGo xEvent module on your DNN site.
System Requirements
Before using xEvent, make sure your environment meets the following requirements:
- DNN platform: DNN 9.8.0 or higher (compatible with DNN 9.x and DNN 10.x)
- Permissions: Superuser (Host) access
Installation Steps
Step 1: Log in to your site
Log in to your DNN site with a superuser (Host) account.
Step 2: Open Extension Management
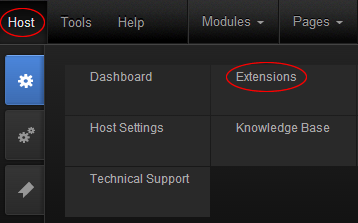
Navigate to Settings → Extensions.
Step 3: Install the module package
- Click the Install Extension button to start the wizard.
- Click Choose File and locate the
DNNGo_xEvent_x.x.x_Install.zippackage on your computer. - Click Next; the wizard uploads and installs the module automatically.
Step 4: Add the module to a page
After installation, on the page where you want to display the event calendar:
- Enter the page's edit mode.
- Add the DNNGo xEvent module to the page.
- The first time you open the module, you will be prompted to bind or activate a license — see License Activation.
Admin Area
After adding the module, users with edit permission can open the admin area of xEvent. The admin menu is organized as follows:
| Menu | Description |
|---|---|
| Events | Add New Event, All Events, Categories, Import Export |
| Address Book | Manage venues, map coordinates and markers |
| Library | Manage media files used by the module |
| Event List Skins | Skin selection, options and styles for the list page |
| Event Detail Skins | Skin selection, options and styles for the detail page |
| Settings | General, Comment, Rating, Social, SEO, Share, Registration and WebApi settings |
| Notifications | Email settings and email templates |
| License | View license status, obtain the Machine Key |
TIP
Some menus (Import Export, Skins, Settings, License) are visible only to administrators and above. Authors see the event menus by default — adjust this in the Author Panel of the General Settings.
Next Steps
- Activate your license — unlock the full functionality
- Add New Event — create your first event